Creating Database-driven Websites with PHP&MySQL
What is this tutorial about?
Any Pre-req's?
A birds-eye view on web applications
The Web Browser's Job
The Web Server's Job
A (sloppy) intro to the world of server-side programming with PHP
Outputting text
Variables + Simple Math
Conditional statements
Looping control structures
Text Manipulation
Collecting data via HTML forms
A minimalistic form-processing web application
Input Validation
Using forms with text areas, list boxes, check boxes and radio buttons
Passing data to a PHP script via the URL
Making data persistent
Session Management
Using a database for persistent storage
Setting up a database
Preparing a MySQL database
Interacting with a database
Connecting to a database
Adding, updating, deleting and querying data
Putting it all together in web-based personal address book
(Somewhat) Advanced server-side scripting
Authentication and Authorization
Sending emails
Security considerations
Risks
Sources of vulnerabilities
Other server-side web technologies
ColdFusion
ASP and ASP.NET
Java Servlets and JSP
Resources
Acknowledgements
Introduction
If you would like to collect data via the web, simplify the maintenance of your website, or perhaps enrich the user experience of your site, you might need more than just a web site consisting of static pages.
Using a database in conjunction with your web server, you can store similarly structured information (such as customer data, survey responses or contact information) in one place and automatically produce numerous web pages on-the-fly such as an employee directory or a web-based service request application. You can easily reuse certain data in different places (e.g. have a listing of all employees along with separate home pages for each employee) while keeping the maintenance effort low. Once your website needs a redesign you will only have to change one template file rather than a myriad of pages.
What is this tutorial about?
This tutorial explains the basic concepts behind database-driven websites, often also referred to as web applications. Using the popular server-side-language PHP and the database MySQL, I show how to implement core dynamic features such as collecting data, storing data in a database, searching a database, or validating user inputs. Although I use PHP and MySQL, most of the concepts discussed here apply equally to other languages (ASP, ASP.NET, JSP, ColdFusion etc.) and other databases (PostgreSQL, SQL Server, Oracle etc.).
Throughout the tutorial I will use the particular example of a web-based personal address book to illustrate the ideas.
Any Pre-req's?
This tutorial assumes good knowledge of basic web concepts such as
web pages, links, publishing pages to a web server, and HTML. Although
it would be helpful, I do not assume
that you have prior experience in computer programming beyond hand-coding
in HTML.
A birds-eye view on web applications
Web applications are by nature distributed applications. In particular,
this means that one part of the application is executed on the web server
while another runs on the client computer within a web browser window
(see Figure 1).
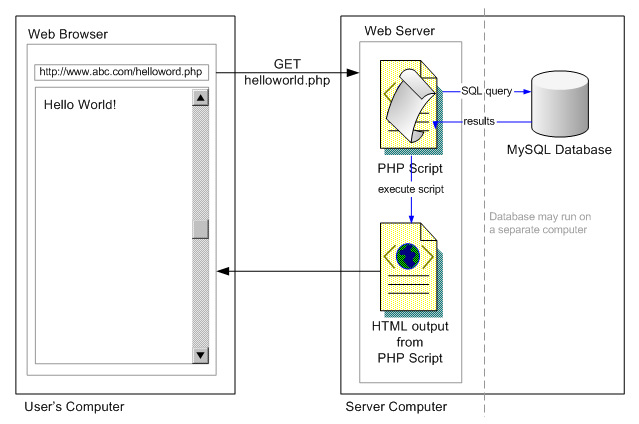
Figure 1: A web browser requests
a document from the web server. The web server parses and executes a
PHP script which dynamically assembles the HTML code that is then sent
back to the browser which renders the HTML code into a webpage.
When the user types in a web address (URL=Uniform Resource Locator) and hits the enter key (or clicks on a link or chooses a bookmark), the web browser sends this address in a so-called HTTP request (HyperText Transfer Protocol) to the web server. If the web server receives a request for a static HTML file (typically indicated by a file name ending in .html or .htm) it merely locates the corresponding file on its harddrive and sends it back to the computer that had requested it. If the web server receives a request for dynamic files (often indicated by .php, .asp, .cfm, .jsp etc.), it does a little bit more before sending a response to the web browser. But more about this later...
The Web Browser's Job
The web browser is responsible for displaying the layout described by the HTML file it has received (this process is called "page rendering"). Once the web page is rendered on the screen the user can interact with it - click on links, fill in forms etc. Since HTML alone provides only a crude level of interactivity (namely links, form elements, buttons and image maps), JavaScript was developed. JavaScript is a programming language which gives the web designer a number of options for creating sophisticated user interfaces (e.g., input validation, pop-up windows, cascading menus). JavaScript code is often contained within an HTML file enclosed by the <script> tag. JavaScript is always executed by the web browser. The web server is fully ignorant about JavaScript (well, there is something like server-side JavaScript but let's not talk about it); it just serves up any HTML, JavaScript or pictures that have been requested without analysing or executing any code. To further avoid confusion: Beyond its name, JavaScript has very little in common with Java, which is a programming language that is often used for programs (java servlets, java server pages) running on the web server as well as for highly-interactive (but sometimes slow and crash-prone) java applets running on the client computer. Therefore, when creating a mental map of web technologies, you better place JavaScript and Java in opposite corners.
The Web Server's Job
So far, I have only discussed how a web server handles requests for
static files (HTML pages, images, etc.). However,
if we want to construct our web pages from data contained within a database,
the web server will have to do some more work. If the web server receives
a request for a dynamic file (indicated by a file ending .php
and some others) the web server will locate the file on its harddrive
and interpret (a.k.a. parse) and execute its contents. PHP (a
recursive acronym for "PHP: Hypertext Preprocessor")
is a programming language for creating dynamic web pages and is always
executed
on the web server
(as opposed to the web browser on the client computer). Typically PHP
commands output certain HTML code depending on user input or data read
from a database etc. This resulting HTML code is then sent back to the
web browser for rendering. This is best seen by some examples.
A (sloppy) intro to the world of server-side programming with PHP
If you already know some PHP just skip this section and proceed with "Collecting data via HTML forms".
Figure 2 shows a trivial example of a so-called PHP script. As you can see, it mostly looks like a regular HTML page with some strange codes embedded within it. When the web server receives a request for a file with a name ending in .php, it opens and searches the file until it encounters the PHP start tag "<?php". From that point on it will execute all code until it encounters the PHP stop tag "?>". Note that a web server needs to be configured for running PHP. Therefore, by far not all web servers support PHP. If you ever see the "<?php" tag displayed in your web browser, you know that the web server does not execute PHP code but just passes it back to the web browser like it does with regular HTML content.
Outputting text
In this particular example the web server will execute the command echo "Hello World!"; and replace it (as well as the start and end tags) with the output of the command, namely just Hello World. The web server sends only the resulting output (plain HTML) back to the web browser. Therefore, the web browser never gets to "see" or execute any PHP.
<html> ... <body> |
view PHP source; view produced HTML; view HTML rendered
Variables + Simple Math
Of course, PHP can do more than simply outputting some text. Almost all programming requires working with what are called variables. Just as a jar can hold pickles, a variable holds data like numbers or text. Although, you can typically fit more than one pickle into a jar, you can only put exactly one data value into one variable. However, some special variables, called arrays, can hold more than one value at a time. You can exchange a data value with a new one at any point in time by assigning a new value. The assignment operator "=" is used for this purpose. Figure 3 exemplifies the concept of variables. Each variable starts with a "$" sign and has a name (e.g., "$a", "$mySalary"). The name is case-sensitive meaning that "$myage" and "$myAge" are two distinct variables. Notice also that every PHP statement ends with a semicolon. The double-slash // starts a comment line in PHP. Comments are not processed by PHP but are used to annotate your code.
... |
view PHP source; view produced HTML; view HTML rendered
Conditional statements
In order to implement conditional behavior you can use control structures such as "if-then" clauses (see Figure 4). Note that the echo statements are enclosed by the block delimiters "{" and "}". The if-statement includes two conditions that are connected by a logical "and" written as && (a logical "or" is written as ||, a negation as exclamation mark !, e.g. !$inUSA). To show just one more use for variables, $inUSA does not hold a number but rather the boolean value true (false is the opposite). In order for the statements within the block delimiters to be executed, $age < 21 and $inUSA must both evaluate to true. PHP offers a number of different comparison operators, most prominently <, >, >= (greater or equal), <= (less than or equal to), != (unequal), == (equal). A word of warning: do not accidentally use the assignment operator = to test for equality. This frequent error typically leads to unwanted results.
Also, I included the HTML tag <br> at the end of the first line. This makes sure that the second sentence is printed on a new line in the resulting web page.
... |
view PHP source; view produced HTML; view HTML rendered
Looping control structures
Figure 5 shows a PHP script that uses another important control structure - the "for" loop - to output all numbers between 1 to 1000 along with whether they are odd or even. In the head of the "for" loop you need to specify a start value ($number = 1), a condition that gets tested before each iteration ($number <= 1000) and a statement that tells PHP how to increase or decrease the variable ($number++ means: increment the variable by 1 at each iteration). Thus the "for" loop here translates to: starting with the variable $number being equal to 1, and continuing as long as $number is less than or equal to 1000, each time through the loop add 1 to $number and execute the code between the block delimiters.
This example also introduces the concept of so-called functions. Functions are pre-defined (or user-defined) code modules that, given one or more parameters, return a certain value. For example, the floor function returns the part of a number that comes before the decimal dot (floor(7.65) is 7). Note again, that the double equal sign "==", not the single equal sign is used for making comparisions for equality.
You will find a complete listing of all available control structures at the PHP website.
... |
view PHP source; view produced HTML; view HTML rendered
Text Manipulation
PHP has excellent text manipulation capabilities. A text contained in a variable is often called a string (as in string of characters). You can concatenate strings (using the . or "dot" operator), capitalize them (using strtoupper), search for certain sub-strings (using substr) etc. Figure 6 shows some uses. Note that the index number of the first letter in a string is 0, not 1. You will find all available string functions listed at the PHP website.
... |
view PHP source; view produced HTML; view HTML rendered
A somewhat tricky issue in PHP is the use of special characters and quotes. By default, you should put all string values in double-quotes as in "some string". If you want to output a double-quote character itself you need to escape it by preceding it with a backslash as in "\"". Another frequently-used special character is the new line. If you output "\n", all following text will appear on a new line. This comes in handy when reading from and writing to files. Note that when outputting HTML code you will still have to echo the "<br>" tag to create a line break that is displayed in your web page. As an alternative to the double-quote you can use the single quote as in 'some string'. The practical differences are small. You may want to use single quotes when you want to output a lot of double quotes without having to use escaping, for example 'I like quotes "very much"'. Using double-quotes is useful because variables included in a double-quoted string are automatically evaluated to their value and included in the resulting string. Thus, in the previous example echo "Hello $firstName!"; would evaluate to Hello Jonathan!. If, on the other hand, you used single quotes and coded echo 'Hello $firstName!';, PHP would output Hello $firstName!.
Now that you know everything about PHP, let's go on to put it to use.
Collecting data via HTML forms
In order to collect information via the web, we typically use HTML forms. Virtually any web editor can assist you in the task of creating a form containing text fields or text areas, check boxes, radio buttons, drop-down lists and buttons. Once the user hits the submit button of the form the filled-in data is transmitted to the web server.
The most important attribute of the HTML <form> tag is the action attribute. It specifies where exactly the form data will be send to. Unless otherwise defined, the data is submitted to the same web server that the HTML form page got loaded from. The action attribute also specifies which script the web server will pass the data to. When using PHP, the form tag may look like this: <form method="post" action="handleinput.php">. In this case all the data the user filled in will be sent to the handleinput.php script located on the web server.
The data can be sent to the web server in two different ways (determined by the method attribute of the HTML tag <form>). One way is called the post method, the other one the get method. For all practical purposes, the only difference is that, using the get method, all submitted data is shown in the web browser address bar (and the web server logs), while using the post method, the data is posted in a hidden way and not visible in the address bar or web server logs. Using the post method is definitely preferred when submitting confidential data such as passwords. Uses of the get method will be discussed later.
A minimalistic form-processing web application
Figure 7 and Figure 8 show a minimalistic form-processing web application consisting of two separate web pages.
... <form method="post" action="handleinput.php"> |
view HTML source; view HTML rendered
... |
view PHP source; view produced HTML; view HTML rendered
The web page containing the input form is called inputform.php. Since this file does not contain any PHP code I may have just as well given it the name inputform.html. However, in order to keep things simple (and avoiding extra effort if PHP is required at a later point in time) I recommend giving all your files the extension .php whether or not they actually contain PHP code. In the input form the attributes name="firstname" and name="lastname" determine the name of the variables that are later accessible by handleinput.php through the system-defined $_POST array variable. Note that many (but not all!) PHP installations would let you use $firstname and $lastname right away without having to get their values assigned from $_POST (many system administrators configure their servers such that all form variables are automatically assigned to a corresponding PHP variable name). However, if you implement your PHP code as shown above, it will work on any web server, regardless of the mood of your sysadmin. Furthermore, these "extra" two lines improve the security of your script as will be discussed later.
Note that the system-variable $_POST is only available since PHP Version 4.1.0. If you have an older install, use $HTTP_POST_VARS instead.
Input Validation
Instead of having two separate web pages, one for the input form and one for the handling of the form data, you can also combine both into one - resulting in a web page that "sends data to itself". At first, this may seem somewhat confusing but it has many merits beyond just avoiding having two pages for a simple form submission process. Figure 9 shows the example from before, enriched with an input validation routine that makes sure that both, a first name and last name have been entered.
<?php |
view PHP source; view produced HTML; view HTML rendered
At first, the example above may seem a bit overwhelming but let's deconstruct it. You might have noticed that instead of naming a particular web page, the action attribute of the HTML <form> tag contains the PHP code <?php echo $_SERVER['PHP_SELF']; ?>. When evaluated on the web server the output of this code will be inputvalidation.php. We may have just as well used the latter explicitly but by using this PHP code we have the advantage of being able to rename the web page without breaking its functionality.
Note that the system-variable $_SERVER is only available since PHP Version 4.1.0. If you have an older install, use $HTTP_SERVER_VARS instead.
The following describes step-by-step what happens after the user types ".../inputvalidation.php" into the web browser address bar and hits the enter key. First, the web browser sends a request to the server for the web page titled inputvalidation.php. The web server locates the file inputvalidation.php on its harddrive and (because of the file-ending .php) parses the file and runs all PHP code contained within. The first block of PHP (on the very top of the file) does not have any effect (and no output) because the user has not yet pressed a submit button (which results in the variable $_POST['submit'] being empty). Therefore, the whole condition evaluates to false and the statements within it are not executed. The PHP code if ( $error && empty($firstname) ) also evaluates to false since the variable $error has not been set (default is false). That is why no error message is printed out. The same applies to the input validation for the last name. The web server replaces all the PHP statements with their respective outputs, in this case nothing (with the exception of the "<form action..." attribute). Therefore, only the HTML input form is sent back to the web browser. After receiving the HTML, the web browser renders the page and presents it to the user.
Let's say, the user fills in a first name but leaves the last name blank and presses the submit button. The web browser sends the form data to the web server, more specifically to the script called inputvalidation.php as specified by the <form action...> attribute. Now, the condition in the first PHP block evaluates to true (because the submit button has been pressed). Therefore the following lines of code are executed. Because no last name has been entered by the user, the expression if ( !empty($firstname) && !empty($lastname) ) evaluates to false and the statement Header("Location: inputsuccess.php"); is not executed. This statement would send the user to a different page, namely inputsuccess.php (using a so-called HTTP header redirect), if both first name and last name have been entered. However, due to the else {... clause the variable $error is set to the value true.
Within the HTML <input> tag the value attribute is set to <?php echo $firstname; ?> which will output the text the user entered as the first name. Therefore, the user won't have to re-enter the first name. Now, that the variable $error is true and no last name had been entered by the user, the condition if ( $error && empty($lastname) ) evaluates to true and the error message is outputted. After all the PHP code has been executed on the server, the resulting HTML is once more returned to the web browser which displays it to the user.
Let's assume, the user now fills in the missing last name and once again submits the form. The cycle repeats once more. The web server receives the form data, runs the PHP within inputvalidation.php and because both names have been entered, now sends the user to the web page inputsuccess.php. Technically, this last step is a bit (but not much) more complicated. The web server actually sends a response to the web browser telling it to fetch inputsuccess.php. The web browser sends a request for inputsuccess.php to the web server which it returns promptly (after checking it for any PHP code). Finally, the web browser displays the received HTML to the user. That's all. :)
Note, that often (depending on your web server's configuration) you can only use HTTP header redirects before any HTML has been outputted. That's why I put the PHP code at the very top of the file.
Using forms with text areas, list boxes, check boxes and radio buttons
In the examples shown so far I only used text fields to input and handle form data. The processing of other form elements such as text areas, list boxes, check boxes and radio buttons is very similar but syntactically somewhat different. Figure 10 shows the HTML/PHP codes for each form widget and the resulting HTML rendering below. You will see these widgets and PHP code used later for our web-based personal address book example application.
<textarea name="address" cols="40" rows="4"><?php echo $address; ?></textarea> |
|
|
<input type="radio" name="category" value="personal" <?php if ($category=="personal" || !isset($category)) echo "checked"; ?>> personal<br> |
|
personal business |
<input type="checkbox" name="private" value="1" <?php if ($private==1) echo "checked"; ?>> private (hide details such as phone number) |
|
private (hide details such as phone number) |
<select name="yearofbirth"> <option value="0" <?php if (empty($yearofbirth)) echo "selected"; ?>>- select -</option> |
The code above exemplifies how PHP statements can be mixed in at any point in the HTML. In the check box and radio button examples PHP is used to output (or not output) the text "checked" depending on whether or not a particular variable is set. Note that simple spaces can be important like the space in front of the PHP start tag in <option value="0" <?php. If it wasn't there the resulting HTML would read <option value="0"selected> which would be invalid HTML and not work right.
When mixing HTML and PHP you can even interrupt a PHP statement with some HTML and finish it in a different block. For example, <?php if ($a==1) { echo "odd"; } ?> has exactly the same effect as the code <?php if ($a==1) { ?>odd<?php } ?>. However, be aware that mixing HTML and PHP can lead to a serious maintenance and code-readability problem.
Passing data to a PHP script via the URL
Passing parameters via a URL is the second way to "send" data to a PHP script. If you type a URL like http://www.someserver.com/myscript.php?name=Joe into the web browser address bar, it will send the same request to the web server as it would have if you had used an HTML form with an input-field called "name" and employed the get method, assuming you use $_GET (or $HTTP_GET_VARS before PHP 4.1.0) to retrieve the values.
You can use this behavior to submit data to scripts without requiring the user to type in the information. For example you may have a PHP script that outputs the code: <a href="editcontact.php?id=3">edit</a> which to the user would just look like an ordinary link titled "edit". However, when clicked-on this link not only requests the editcontact.php script but also passes data to it. Like you have seen before, this data is then accessible within editcontact.php via $id = $_GET['id'];.
Making data persistent
The HyperText Transfer Protocol "has a bad memory" (HTTP is a so-called stateless protocol). When a PHP script receives data from an HTML form, this data is only available for the duration of the script's execution. This means that by default you can only process the data right after it has been sent but no later. Obviously, this causes problems, for example, when you want your application to "remember" a user's login-ID for the duration of a whole session. There are several ways to address this problem: using hidden HTML form variables, using session management (via cookies and URLs) and using a database. I will not further discuss the use of the HTML tag <input type="hidden"... since it carries many risks to a web application's security (since it can be faked easily).
Nowadays, a web application typically uses session management for short-time data persistence and databases for long-time persistence.
Session Management
Session Management provides something that we take for granted in conversations between humans. When I talk to another person, I assume that she remembers not only what I just said but also what I said 5 minutes ago (and in between we may have taken turns talking). The duration for which a person uses a web site is called a session. Quite frequently, we want the web server (who is the web browser's communication partner) to remember things that happened in the past (such as a user's login, a form submission etc.) so that we can re-use data without having to ask the user to re-enter information all the time. Unfortunately, we have to tell the web server explicitly what data it should remember. This is done as shown in Figure 11 and Figure 12. In Figure 11 a PHP script receives data (first and last name) from an HTML form and stores it in two so-called session variables, i.e. $_SESSION["firstname"] and $_SESSION["lastname"]. In Figure 12 another PHP script accesses the information by reading from the session variables. This may happen 10 minutes later and in any PHP script. The only requirement for making session management work, is that you call the function session_start(); at the very beginning of each PHP script that uses session information (just as with HTTP header redirects, you may run into problems if your script outputs any HTML before calling this function). Information stored in the $_SESSION variable is available for the duration of the whole session. However, the session may time-out after a certain period (e.g. 30 minutes) if the user has been inactive, or more precisely, the browser has not sent any data to the web server.
Note that the system-variable $_SESSION is only available since PHP Version 4.1.0. If you have an older install, use $HTTP_SESSION_VARS instead.
<?php |
<?php session_start(); ?> ... |
In order to end a session, your PHP just needs to call the function session_destroy();. This is often done by a logout script like the one shown in Figure 13. Although not necessary, the last line in this script redirects the user to the home page of the web application.
<?php
  session_start();
  session_destroy();

  Header("Location: index.php");
?>
|
How does a web server identify and re-identify individual users so as to be able to assign the correct session when a request comes in from the Internet? This can be done in different ways, although most often (and most easily) so-called cookies are used to uniquely identify a web browser. A cookie is a piece of data that is stored on the client computer running the web browser. A web application can store any kind of information on the web browser. However, because of security issues (it is quite easy to fake a cookie) typically only a so-called session-ID is stored on the client machine. The actual data (firstname, lastname etc.) is stored on the server. The session-ID is subsequently sent along with every request to the web server, thereby identifying the web browser. Under normal circumstances this whole process will be transparent to you. However, you may run into the problem that a user complains that your web application isn't working correctly. This may be due to the user having previously disabled cookies within the web browser.
Using a database for persistent storage
Session management is a very useful service for short-term data storage. However, after the user has logged out (or the session has timed-out) all information is lost. Often this is not a problem. For instance, if your application's task is to send an email in response to an HTML form submission ,you will not need anything beyond session management. However, in many other cases you may want to store information about a user for longer than just the duration of a single session as in web applications that store customer data, provide an employee directory, etc.
Setting up a database
As the name suggests, databases store data persistently. A database is a piece of software which often runs on the same physical computer as the web server. In larger installations a database can also run on one or more dedicated machines that communicate with the web server.
The web browser never directly communicates with a database but only with the web server, which in turn talks to the database. A PHP script sends or receives data and creates an HTML page containing the results which are sent back to the web browser (see Figure 1).
There are many different database software packages available today. Perhaps, the most popular of them is Microsoft Access. Although Access is a powerful and easy-to-use desktop database it is rather ill-suited for use with web applications (performance and concurrent access are the major issues). In the following we will focus on the use of MySQL, a widely-used open-source database. MySQL is available for free under several different license agreements.
Many web hosting services make a working MySQL installation available to their clients, therefore you are often spared the effort of installing the MySQL software yourself. In order to administer the database (set up data structures etc.), you can either use its command-line-based user interface or a more easy-to-use third-party tools such as the freely-available and quite popular phpMyAdmin. As the name suggests, phpMyAdmin is itself a PHP-based web application and also is offered preconfigured by many web hosting services. However, if you have average sysadmin skills, you can install phpMyAdmin yourself within a couple of minutes. Many more MySQL administration tools are available on the market underlining the popularity of this database software.
Preparing a MySQL database
All of the steps described below can be accomplished by using the phpMyAdmin software. Before you can store any data you need a database. An installation of MySQL can host a large number of individual databases. Most likely your web hosting service has already created a database for you. If not, create one using phpMyAdmin.
Most modern databases store data in so-called tables which you can picture as being similar to a spreadsheet. Each table has columns (e.g. id, first name, last name, phone) and rows (e.g. one customer's data). Record is another word for row. Figure 14 shows an example. Basic web applications may get along with using just one table whereas more complex ones may require a multitude. For example you may want to store customer information in one table, supplier information in another, and orders in a third table. In practice the so-called database-schema (layout) can become quite complex.
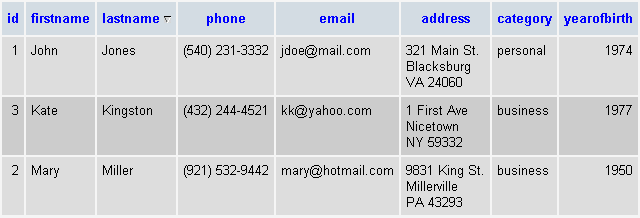
Figure 14: Screenshot from phpMyAdmin listing the database contents
Using a tool such as phpMyAdmin you can create a database schema without having to know much about databases. However, the lingua-franca of databases is SQL (Structured Query Language; often prounounced like "sequel"). This standard (in its latest iteration agreed upon in 1992; you may see references to SQL92) allows application developers to communicate with any compliant database without having to learn product-specific features, at least that is the theory. In practice, almost all databases deviate somewhat from this standard (mostly to offer additional features) which can complicate your life as a web application developer. However, if you stick to the basics, things work fine most of the time.
SQL defines a syntax for creating tables, inserting, updating, deleting data or querying (a.k.a. selecting) data. Figure 15 shows some simple examples. Note that SQL commands are case-insensitive and also quite indifferent to superflous spacing and new lines. You will find more commands in a SQL tutorial (please read this tutorial if you get confused by the following). When defining the field names (firstname, phone etc.) case often does matter. I strongly recommend that you use the exact same spelling for the database field names as you use for naming the HTML form elements and the PHP variables. I got into the habit of using all lowercase, words run-together identifiers (such as "yearofbirth"). There are many other naming schemes; it just matters that you stick to one.
CREATE TABLE contacts ( |
INSERT INTO contacts (firstname, lastname, phone, email,
  address, category, yearofbirth, private)
VALUES ('Joe', 'Doe', '(991) 983-3134', 'joe@mail.com',
'123 Main Street\nBlackburg\nVA 24060', 'business', 1974, 1); |
UPDATE contacts SET lastname = 'Smith' WHERE id = '2'; |
DELETE FROM contacts WHERE id=2; |
SELECT * FROM contacts ORDER BY lastname; |
I used the SQL create command shown in Figure 15 to define
the database-schema for our example web-based
contact database.
Interacting with a database
Connecting to a database
As stated earlier, the only way a web application can communicate with a database is through code running on the web server (like a PHP script). Before a PHP script can receive or send data from or to a database, it needs to establish a so-called connection. In practice this comes down to just two lines of PHP code you will have to insert once in every script that needs to communicate with the database. Figure 16 shows some prototypical code. There is more than one way PHP can communicate with MySQL. Therefore, when reading a book about PHP/MySQL, you may find a different approach that the one employed here. I typically use the PHP PEAR database layer to communicate with MySQL (and other databases). It has the advantage, that it makes switching to a different database software (such as PostgreSQL, Microsoft SQL server or Oracle) almost trivial.
As you can see in Figure 16, a variable called $database is initialized which later will be used to "represent the database" (I wouldn't worry about the details). Note that the PHP code contains such sensitive information as the database user-ID and password. Make sure that only authorized persons can view your PHP code. Otherwise, you expose your data to a huge security risk.
... <?php // load the PHP PEAR database library |
Adding, updating, deleting and querying data
Figure 17 shows how a database is queried for information. The first line of PHP code sets up a database connection. This differs from what you have seen in Figure 16. Instead of putting all the sensitive information (database user name, password etc.) directly into the script we store this information in a separate place (dbconnect.php, see Figure 18) and include the file (using the include statement).
Select
The overall purpose of this PHP script is to list all names in tabular format. The header of the table is defined in regular HTML. The rows showing the individual names are produced by the PHP code which first sends a SQL query to the database, and then iterates over all of the records that have been returned. The variable $result holds a reference to all of the returned data. Each returned row of data (or record) has a number associated with it (starting at 0, not 1). Using a for-loop I fetch one record at a time (by referring to its number $i) and assign it to the array variable $contact. The code then outputs the necessary HTML for a table along with the first and last name recently retrieved from the database. DB_FETCHMODE_ASSOC is geek talk for saying that the database results should be accessible by their field names instead of their indices (that's not much less geeky, is it?). If you don't use DB_FETCHMODE_ASSOC, you would have to work with $contact[1] (instead of $contact['firstname']), $contact[2] (instead of $contact['lastname']) etc. which results in significantly less readable code and in potential confusion if you re-arrange the fields in your database schema.
<?php |
view PHP source; view produced HTML; view HTML rendered
In Figure 18, the database connection string is assembled from individual variables. This is not necessary but makes the PHP code somewhat easier to understand. From placing the database connection information in a separate file (dbconnect.php), we gain the advantage of having to update only one file in case something changes.
<?php // load the database library |
Insert
Adding (inserting) a new record to a database follows the same paradigm as querying a database - first set up a connection, then send a SQL statement to the database. In the example shown in Figure 19 a string is assembled piece by piece. We could have just as well written everything on one line but the way shown here is easier to read. Note that the first line of PHP code that constructs the query starts with $query = whereas all the following read $query.= (the dot is the string concatenation operator). After the query is assembled it is sent to the database. The database will return a success/error code in the variable $result which we could evaluate if we wanted to.
<?php |
Update
Quite similar to inserting a record is updating a record. Some prototypical PHP code is shown in Figure 20. This example assumes that the variables $firstname, $lastname etc. have been previously assigned. This may have happened in response to the data received from an HTML form. The variable $id must contain the record number of the data record that should be updated. This record number can be determined by querying for all records and noting the number returned by the database. In our example personal address book web application, the "edit" link on the "My Contacts" screen carries this information. Put your mouse cursor over the "edit" link and observe the web address in the status bar. The address ends with ...?id=....
<?php |
Figure 20: Updating a database record
Delete
The PHP code for deleting a record is almost identical to the update
code with the difference that you would use the SQL delete command as shown
in Figure 15.
Putting it all together in web-based personal address book
The web-based personal address book is an example for a basic web application, that collects data (Add a Contact), updates data (edit link), deletes data (delete link) and queries data (My Contacts screen lists all contacts in the database). It furthermore shows how sorting can be implemented quite easily (click on the column headers on the My Contacts screen).
Five PHP scripts, each implementing a distinct functionality, comprise the web application. Figure 21 lists the task each of the scripts perform.
dbconnect.php |
Connects to the database as shown in Figure 18 |
listcontacts.php |
Queries the database for all names; depending on the $sort variable,
the rows are either sorted by first name or last name; outputs a table
with all data including edit and delete links which
contain the record-ID as a parameter (e.g., ...?id=2);
the
delete link is intercepted by a JavaScript confirmation message; view PHP source; view produced HTML; view HTML rendered |
addcontact.php |
Collects user input and submits it to itself (see <form
action...); validates that at least a first and last name have been
entered; displays error messages if data is missing; if data is complete
it is added to the database; view PHP source; view produced HTML; view HTML rendered |
editcontact.php |
Structurally almost identical to addcontact.php with the difference
that it pre-fills the form with the data that is already in the database;
the record number is indicated by the variable $id which
is passed to it by the edit link in
listcontacts.php); otherwise does the same job as addcontact.php but
updates the data instead of inserting it; view PHP source; view produced HTML; view HTML rendered (using id=1) |
deletecontact.php |
Deletes the data record whose id number is equal to
the one passed to the script in the variable $id (delete link
in listcontacts.php); after a record has been deleted, it redirects
the user to listcontacts.php; view PHP source; |
Because they mix HTML, JavaScript, Style-sheets and code fragments, PHP scripts can quickly become messy and therefore hard-to-maintain. Try to modularize the functionality of your application and avoid having one script doing too many tasks at once. I typically use a separate PHP file per function. A frequent exception to this rule-of-thumb is combining the add and edit script. Although this leads to longer and harder-to-understand code, it has the advantage that you maintain the layout of the input form in only one place. Imagine you had to add a new field like birthday to the HTML form. If you have two separate files you will have to make the same change twice. If you have only one, you have to do less work.
Another way of modularizing your code is to put frequently-used functionality
into self-defined PHP
functions. As you have seen before, you can even place
PHP statements (and functions) into a separate PHP file and include them
using the include statement. All this
can help to make your code shorter, cleaner, easier-to-maintain and more secure.
(Somewhat) Advanced server-side scripting
PHP can do many more things than just printing out HTML and communicating with a database (like reading and writing files, creating images on-the-fly, parsing XML, fetching contents from remote servers etc.). It would go beyond the intentions for this tutorial to show all its power. However, I want to at least briefly describe how to implement a login-protected website and how to send emails from within PHP.
Authentication and Authorization
Authentication is making sure that a person is who they claim to be. A typical way of ensuring authenticity is requesting some user-ID and password. Authorization determines whether or not a certain person (or group of people) should have access to certain resources.
Users may authenticate via an HTML form that asks for their user-ID and password. For security reasons always use the post method for sending the form to the server. Figure 22 shows a simple login script.
<?php |
view PHP source; view produced HTML; view HTML rendered
Preferably the user-ID/password combination should be checked against a database rather than being hard-coded into the script. Figure 23 shows a login script that authenticates users against a database table called "users". This database table has been created with the SQL statement shown in Figure 24. Note that for security reasons the table stores the password in encrypted form rather than in clear-text. If you would want to add a new user-ID/password combination you would have to first encrypt the password using PHP's crypt function (<?php echo crypt("mypassword"); ?>) and then store it in the database. If you view the full source code of the script you will also notice a number of additional security checks which make the script more user-friendly as well as more secure.
<?php
  session_start();
  include('dbconnect.php');

  $loginerror = ""; // by default assume there is not login error
  if (isset($_POST['login'])) {
    // test for the correct user-ID & password
    if (!empty($_POST['userid']) && !empty($_POST['password'])) {
      $userid = strtolower($_POST['userid']); // avoid upper/lowercase problems
      if (ereg("^[a-z0-9]{2,8}$",$userid)) { // protect from SQL injection attacks
        // verify this userid/password combination against a database
        $query = "SELECT * FROM users WHERE id='".$userid."'";
        $result = $database->query($query);
        if ($result->numRows() > 0) {
          $user = $result->fetchRow(DB_FETCHMODE_ASSOC,0);
          if ( crypt($_POST['password'],$user['passwordcrypt'])==$user['passwordcrypt'] ) {
            $_SESSION['userid'] = $userid; // remember the user-ID
          }
          else {
            $loginerror = "Wrong user-ID or password. Please try again.";
          }
        }
     ...
  } // end: if (isset($_POST['login']))
...
    if (!empty($loginerror)) {
      echo $loginerror,"<br>";
    }
...
|
view PHP source; view produced HTML; view HTML rendered
CREATE TABLE users ( id CHAR(10) NOT NULL, passwordcrypt CHAR(20) NOT NULL, PRIMARY KEY (id) ); |
Figure 25 shows a typical logout script. Its only role is to destroy all data previously stored in the session and redirect the user back to another page like the login screen.
<?php |
view PHP source; view produced HTML; view HTML rendered
Sending emails
Using PHP's mail function you can send e-mails from within a script. Figure 26 shows an example script that takes the input from an HTML form and sends it in an e-mail to the administrator. At the first invocation, the script presents the user with a registration form. When the user clicks on "Submit", the data is sent back to the same script ($_SERVER['PHP_SELF']). If the user fills in all three input fields, the information is send to the registration administrator with the email address myname@mydomain.com. The resulting e-mail message will contain 5 lines (one blank) of text. To indicate a line ending, use the new line code \n.
... <?php |
view PHP source; view produced HTML; view HTML rendered
Security considerations
Disclaimer: Even if you follow all the guidelines below you should not assume that your application is 100% secure. New security vulnerabilities are uncovered daily and the only workable approach is to stay vigilant and to reassess your applications periodically. Unfortunately, this means "extra work".
According to an "old" saying, the only truly-secure web application runs on a server which is located in a bomb/earthquake/flood/you-name-it-safe room, protected by plenty of guards and not connected to any type of computer network. In other words, no usable service can be 100% secure. However, by following a couple of guidelines you can reduce the risk of falling victim to an attack.
Risks
Why care about security? The risks of a security breach can be manifold and may range from de-facement (someone posts inappropriate messages on your website), data theft (hopefully you don't collect social security or credit card numbers), data integrity issues (modification or deleting of your data), to misuse of your computing resources (someone uses your computer to hack someone else's).
Sources of vulnerabilities
Web applications are vulnerable to attacks on many different levels. Perhaps, the most obvious way to compromise a web application is to hack the web server it is running on. Make sure, your web server's operating system, and server software is appropriately configured and patched. This is quite time-consuming and far from trivial. If you are not an expert system administrator, consider hosting your website on a server that is professionally administered. Related and often forgotten are the risks to physical integrity. If someone steals the server that is located under your desk, you would lose not only the hardware but also all your data. A caring coworker who unintentionally waters not only your plants but also your webserver may have have a similar effect - another good reason to host your website in a protected and well-managed environment as you would get if you use a professional web hosting service.
Another rather obvious security breach is if the attacker gets hold of the user-ID/password combination that you use to login to the webserver and edit the web application. Therefore, keep your password non-trivial and safe. The latter is difficult if you use un-encrypted data-transfer protocols such as FTP. A malicious person could potentially capture your password by eavesdropping on the network. SFTP, FTP over SSL, or WebDAV over SSL are more secure alternatives.
While on the topic of passwords... Make sure to hide your database password. It is quite easy to accidentally expose vital database connection information by putting it in a PHP script. If, for some reason (e.g. wrong file extension), the webserver does not execute your PHP script, it may arrive in cleartext at the user, exposing passwords and other "useful" information.
Less obvious are vulnerabilities due to the way the web as a whole and PHP in particular functions. It is quite easy to accidentially write insecure PHP code (the same is true in varying degrees for other technologies such as Java, ColdFusion or ASP).
One feature that makes PHP well-suited for beginners is the automatic registration of POST/GET/Cookie/Environment variables. If your webserver's PHP installation enables the option register_globals then PHP automatically creates variables with names matching those of your HTML form elements. For example, you could use $phone without having to first get its value assigned from $_POST['phone']. While this is handy it also creates some security risks (as you can read about in the documentation to register_globals). Therefore, whether or not your webserver enables this directive, you should always explicitly initialize variables at the beginning of your PHP script, e.g. $authorized = false;. Also, in order to ensure that your PHP code runs on any other webserver (you may switch servers at some point), you should stick with explicitly assigning form variables, e.g. $phone = $_POST['phone'].
An even bigger danger to the integrity of your data are un-checked user inputs. Do not trust any user input - check all inputs. This includes forms inputs (post/get method), parameters that are passed via a hyperlink link (get method), browser cookies, and even automatically-assigned (and fake-able) environment variables such as browser-ID or referer information. If you want a user to enter a ZIP code then validate the input you receive from the form before you store it in your database (you could check easily whether the input is a number between 10000 and 99999). Input validation not only protects you from risks such as cross-site scripting (a risk to your users) or SQL injection (a risk for your data) but also helps users catch mistakes.
In conclusion, I recommend that you do not feel too comfortable about the security of your web application. Be particularly vigilant when collecting sensitive information such as social security or credit card numbers or avoid it altogether. Even websites as famous and well-managed as Amazon have fallen victim to data theft.
If you like to learn more about PHP security read the article "Programming PHP with Security in Mind" by Nuno Loureiro.
Other server-side web technologies
There are a number of technologies quite similar to PHP, the most popular ones being Macromedia's ColdFusion, Microsoft's ASP and ASP.NET and Sun's Java Servlets and JSP.
ColdFusion
ColdFusion is perhaps the only server-side language that is easier to learn than PHP. In terms of functionality it is comparable to the other languages, excelling when used to create "rich" Internet applications in conjunction with Macromedia's Flash technology. However, since ColdFusion is a proprietary technology it does not even come close to the community support and available literature and tutorials that PHP benefits from. Last but not least a ColdFusion server costs money while PHP is free.
ASP and ASP.NET
If Microsoft Windows and Internet Information Server, MS Access and/or SQL Server is your platform of choice, you should consider using ASP or even ASP.NET. The ASP family is well integrated into the Windows platform. Visual Basic is the syntax used for ASP. In its functionality ASP is comparable to PHP, although ASP.NET goes beyond what PHP currently offers. ASP.NET includes the notion of components, like validation components or a calendar, which can be added with one line of code but are translated by the server to the appropriate HTML and JavaScript code. Furthermore, ASP.NET supports a number of different programming languages. Microsoft advocates authoring ASP.NET in C#, a language structurally very close to Java, although Visual Basic, and others are also available. Regarding performance, ASP.NET is far superior to ASP since it compiles code (like Java Servlets) and does not have to interpret scripts on every run like ASP, PHP or ColdFusion.
However, if you like, you can still run PHP on a Windows platform. The Apache webserver and a PHP module for Windows are readily available and quite straightforward to install (unless you need LDAP support etc.).
Java Servlets and JSP
Next to ASP(.NET) Sun's Java Servlet Technology (see also Servlets and Java Server Page tutorial) is the second technology widely used in industry. It has the reputation of being a professional-grade server-technology which comes at the price of complexity (difficult installation, deployment, debugging). Servlets are Java programs that are compiled and invoked by the server upon each user request. Theoretically, Servlets (and ASP.NET) outperform interpreted languages such as PHP, or ASP. Practically, this difference is only noticable in high-load situations. If your web application supports less than perhaps 20-30 parallel(!) users you probably won't notice the difference. Java Server Pages (JSP) are very similar to PHP scripts - they are webpages that contain HTML intermixed with Java Code. Upon first invocation, a JSP is translated into a servlet and compiled which results in a performance benefit for all subsequent requests. At the same time JSP has the advantage of being fairly easy to author. In conclusion, the Java Servlet Technology is an attractive option for professional programmers but because of its complexity beginners should stay away from it.
Resources
- www.php.net: The authoritative source for PHP information
- VT Web Hosting Service: free PHP/MySQL web hosting for Virginia Tech organizations
- SQL tutorial by Art Branch Inc. (see also: Intro to SQL, Advanced SQL)
- Programming PHP with Security in Mind by Nuno Loureiro
- Installing PHP and MySQL under Windows XP using the WinLAMP package
- Open Directory/Google's PHP Tutorial section : More PHP tutorials
- Open Directory/Google's MySQL Tutorial section: More MySQL tutorials
Acknowledgements
Many thanks go to Betsy Blythe for supporting this project as well as to Ed Schwartz, Anthony Atkins, Andrea Coles, Robert Fentress, Jan Gibb, Kaye Kriz, Gerry Lake, Jean Lacoste for their invaluable feedback and help.
Tutorial available at: http://www.hosting.vt.edu/tutorials/phpmysql/, last modified:
July 3, 2004